DJ Mixing Software  

Browser

Browser :

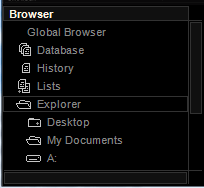
The Browser panel manages the songs database, multiple playlists and disks organized in a tree structure. It is used to organize the track collection, to compile playlists and browse the computer. In spite of the complex and large amount of data stored and managed, it was designed to look and feel as simple as possible. A simple click selects the list and instantly displays it in the Playlist view.
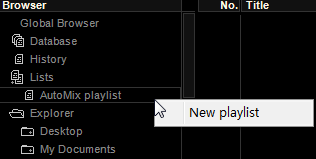
There are 2 pre-created lists: the Database (working just like any other list) and the History list, which has a special meaning – shows the played tracks in their loading order (otherwise is just like any other list too). These two track lists are automatically created, are always the first two shown and cannot be deleted or renamed.

Dropping tracks to any other list will copy them to the new location. The songs will be attached at the end of the selected list.

Most of the operations on the Browser panel are initiated with a right-click on the corresponding element (list, database, explorer). A popup menu will appear with the contextual options for that element.


Adding a new list :

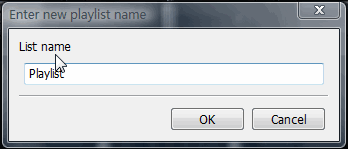
Right click anywhere in the Browser panel and select the New playlist option. A window will appear. This allows adding a new empty playlist to the List folder. The new list requires a name. If none is supplied by the user, Playlist is used as the default name.


Renaming lists :

The Rename option allows the renaming of the lists. A specific dialog box appears asking for the new name for the selected list. This option does not work on the History list.


Deleting an existing list :

If you need to delete an existing playlist, right click on it and select the Delete playlist option. A warning message is displayed asking for your confirmation. This option only works for user created lists. The Database and the History special lists cannot be deleted.


Playlist view :

The Playlist view displays the content of the list currently selected in the Lists Browser or the currently select folder. It is used to conveniently arrange everything from small title sequences, up to whole events.

Within the play list, artist, title, BPM, genre, comment, album, duration, key and file path of an audio file are displayed. A bar marks a title indicating the currently selected track (the main cursor). There are also other types of cursors which will be presented later on.

Each list is automatically saved at the end of the DJ Mixer Professional session and reloaded at the next FutureDecks session start. The History list doesn't get saved and loses it's content (unless you configure it otherwise).


The Playlist has advanced features like instant column sorting, column resize, column show/hide, mouse wheel scroll, mouse and keyboard insertion control, drag & drop between the existing lists and even from other applications, a tag editor, physical delete and an instant search.


Playlist cursors :

Every list maintains its own settings, columns and cursors positions. There are 2 cursors: the main cursor and the next-song cursor. It is very important that you understand this simple concept. The main cursor is used on every current operation. (Eg. if you want to remove a title and press the software button Remove or the Delete key of your computer's keyboard, the song where the main cursor is gets deleted.)

The next-song cursor (which is the orange or blueish one) always tells you which song will be next loaded by the AutoMix feature or when you press the Load/Next button on the deck. The cursor gets updated (moved forward or randomly if random is active) after every loading operation.

Having 2 cursors instead of only one has great advantages. You are free to use the main cursor to browse songs, preview them, edit the tags, search for a song, etc. If you use the main cursor and find a song that you want to be loaded, right-click and choose "Load in Deck X". This command and also a drag&drop of a song to a deck, doesn't change the next-song cursor's position. If you find in the list many songs together and you wish to move the next-song cursor to the new found position he just press ENTER and the next-song cursor is set there.

The playlist view is divided into :

  • Column titles
  • Track information
  • Playlist functions
  • Auto-DJ functions
  • Preview
  • Search
We will discuss each one at a time.

Column titles

The column titles are displayed in the upper part of the list. They work as a whole and offer a lot of options. They even have their own popup menu.
The displayed columns are:
  • Number – the line number
  • Artist, Title – the artist and the song title
  • BPM – the song’s rhythm (Beats Per Minute) as detected by the software on loading / analyzing the song
  • Genre.
  • Duration – in minutes:seconds as detected on loading / analyzing
  • Comment.
  • Album.
  • Filename – complete file path – allows sorting by file path.

Column popup menu :

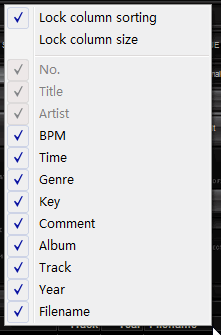
By default, except the Filename, all columns are displayed. The displayed columns can be configured using the popup menu. It can be activated by a right click anywhere on the head row or a left click on the button on the right of the titles.

The checked popup options are the displayed columns or the active options. By default, the No., Artist and Title columns cannot be hidden, all others can be shown or hidden.


List sorting :

To sort titles ascending or descending in a playlist by an ID3 tag or by file name press the adequate column title in the playlist. A little arrow in the head row marks this column. This option can be disabled by checking Lock column sorting in this popup menu.

Column resize :

To change a column’s width, point the mouse pointer into the head row between to columns. It will change into a bi-directional arrow. Now click, hold, and move to the desired column size and release.

Resizing, showing or hiding one column will resize the rest of the columns proportionally. Lock column size option in the popup menu disables the column resizing for the current list.

Track information :

The tracks are organized as lines in the list. The information about each title is divided into columns.


List scrolling :

List scroll has full mouse and keyboard support: arrow keys, Home, End, page Up and Page Down keys.

A mouse wheel step scrolls multiple lines at a time. The scrollbar allows a fast moving between the lines as well as a fine slow search, including an acceleration when scrolling one line at a time.

Adding titles to a Playlist :

Adding files (songs) to DJ Mixeer Professional is very easy and flexible. You can add single or multiple files, whole folders or even iTunes tracks. You just click the Add button and a window appear where you get to select what type of adding you want.

add files / songs


Adding single / multiple tracks

The Add files button opens a file selection box witch allows browsing the entire hard drive and network for a certain music file. It can be a MP3 file, a WAV, a CD Digital Audio track (CDA), etc. The new file is added at the end of the current list. FutureDecks currently supports MP3, OGG, WMA, M4A, WAV, AIF, CDA and AU files. You can also add a M3U playlist (WinAMP compatible).

You can select a single file or multiple files to be added to the current playlist. The file(s) will be added at the end of the list after they are scanned for tag information (artist, title, etc).


Adding an entire directory

The Add folder button opens a folder selection box. All music files in the specified directory are added at the end of the current list. Checking the Recurse subdirectories option will recursivelly search in the sub-folders for music files to add.


Adding the iTunes database

This works on both Mac and Windows if you are using the iTunes software. The whole tracks database is added.

You could also add files to the lists by using the built-in disk explorer in the Browser panel. You just browse to the folder you like and then you can add a single file or the whole folder to the database. You can also create a new playlist directly from a folder (use the right-click option for this).

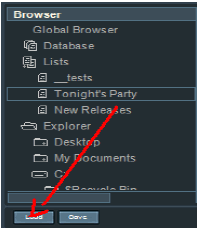
The lists can be saved and loaded so that you can make backups of them or for any other purposes. You could also load M3U playlists that are made with other applications. This works on both Mac and Windows.


Drag&Drop operations :

To move titles to a new list drag them from the current list in the new one in the Lists Browser.

Dropping files on a deck's display from external applications loads in the deck only the first audio file found and ignores the rest of the files dropped. In this case, the loaded file is mentioned in the History list. Dropping folders (directories) directly to a deck does nothing.

Dropping a single file, multiple files or even directories (folders) from other applications anywhere else on the interface (not on the decks' waveform displays) adds them to the current list. The directories dropped on the application are recursivelly scanned for music files and are added at the end of the current list.

Removing titles :

To remove the currently selected track or the marked ones from the list press the Remove button beneath the list or hit the Delete key on the computer's keyboard. When deleting a range of titles, a warning dialog box appears asking for permission to remove them. To clear the current playlist content use the Clear button.

Modifying title order :

Modifying line order can be achieved by the Drag Up or Drag Down buttons beneath the list, or by dragging the selected song to a new position in the list.

Titles popup menu :

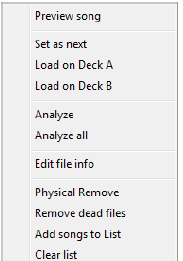
A lot of options are available for each title via the popup menu. You can also press the Windows context (popup) key to display this menu. Using these options you can pre-listen a song, load it in a deck, analyze it, edit it's information tag, delete it and so on.


Preview Player :

To listen to a title before sending it to be loaded into a deck, select the Preview option in the title popup menu or press the Preview button beneath the playlist. The button lights on and the slider next to it marks the position in the song listened. The slider can be adjusted to hear different parts of the song. The preview player plays only in the headphones (monitor output). Press the Preview button again to stop the player.

You can also double-click on a song in the playlist to preview (pre-listen) it.


Back to top

DJ Mixer Home   |   About Us   |   Privacy Policy   |   Sitemap   |   FAQ   |   Glossary   |   Testimonials   |   Affiliate

Copyright © 2016   DJ Mixer Software  All rights reserved.
Mac OS, Mac, iPod, iTunes, iTunes Music Store and Bonjour are trademarks of Apple Inc., registered in the U.S. and other countries.